Data Management
Data Uploader
The Data Uploader is the main place for uploading data into a notebook. With this interface it is possible to parse and upload multiple files of the same type in a single operation. It can be accessed from any notebook, by clicking the ![]() button in the NavBar.
button in the NavBar.
The workflow is straightforward:
select the type of data ot upload
drag&drop or select all files (or folders) to upload
select file format type (if required)
configure the parser (if required)
check parser output preview
upload everything
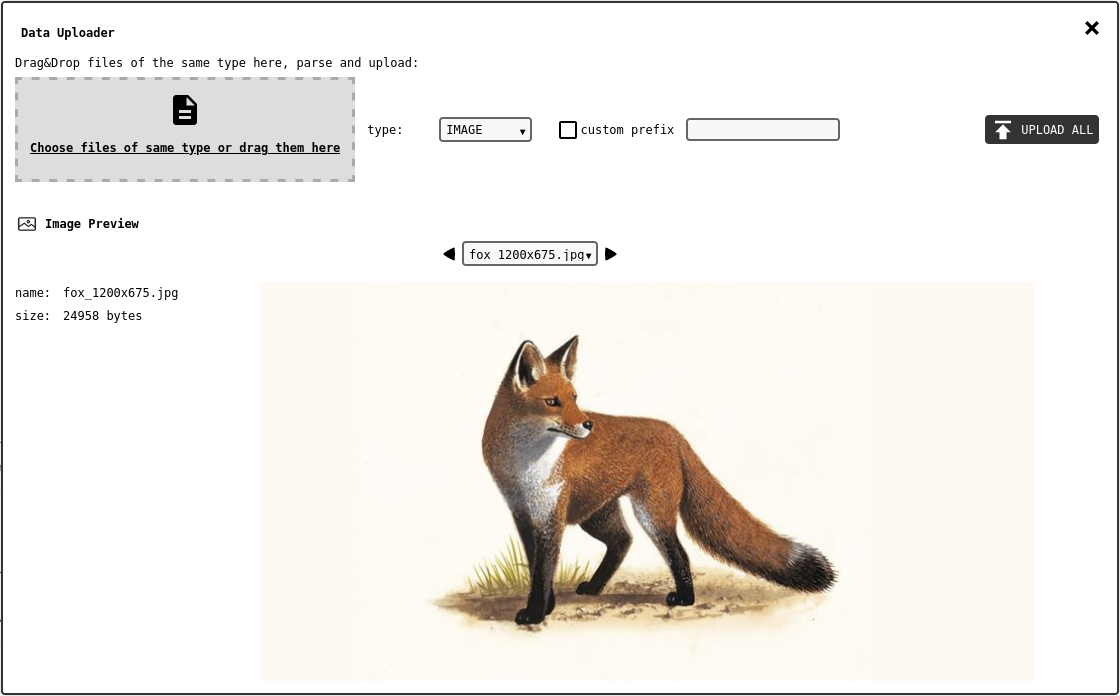
Data Uploader interface (IMAGE data type preview).
It is important to know that data uploaded this way become data records inside AMAD database. Please read the section about Data Records to better understand what happens to uploaded files.
The upper part of the panel includes the drag&drop area, the type/format selectors and few global options for the naming conventions appied to the data records placed in the database.
The lower part of the panel shows the preview of the parser output. The ![]() /
/![]() buttons and record selector can be used to toggle the preview object.
buttons and record selector can be used to toggle the preview object.
Warning
In principle it is possible to drag&drop as many files as desired, but it seems the browser does not let that happen. Users have observed that files become empty when too many are selected, and even when repeatedly uploading smaller batches or ~100 files at a time. Should this happen, just refresh the page and proceed to upload more files.
The following sections discuss supported data formats and their parser configurations.
 FILE
FILE
Files uploaded as FILE data records are not parsed: the record data contains an exact copy of the original file. This format is suitable to all files that need to be stored safely in the notebook, but do not contain parsable data (PDFs, text files, …).
One preview object is generated for each selected file, the preview only shows file name and size.
The default name for a FILE record is the name of the original file.
 IMAGE
Naturally, image files (jpg, png, svg, …) should be uploaded as IMAGE data records. Just like FILE, no parsing occurs and the record’s data is an exact copy of the original image. However, IMAGE records can be displayed anwhere in the notebook by the Image Element.
One preview object is generated for each selected file, the preview shows file name, size, and the image itself.
The default name for an IMAGE record is the name of the original file.
 DATA1D
DATA1D represents one-dimensional arrays, parsed from csv or numpy files. These records can be visualised in several notebook elements such as Table Element or Line/Scatter Plot Element. The accepted formats are:
csv: one DATA1D record for each column in the file
npy (2D): one DATA1D record for each column in the numpy matrix
npy (1D): one DATA1D record for each file
One preview object is generated for each selected file, and the preview shows a table with all records that could be extracted from the file.
The default record names are extracted from the source file if it is in csv format, or automatically generated for npy files.
 DATA2D
DATA2D is used to store matrixes, and can be visualised by the 2D Plot Element. Currently, these records can only be parsed from numpy files that contain a two-dimensional tensor.
Each file generates one preview object, displayed as a 2D plot.
The default record name is the source file name.
 DATA3D
DATA3D is used to store three-dimensional tensors, parsed from numpy files only. At present there is no notebook element for their visualisation.
Each file generates one preview object, displaying a partial list of tensor values and an isosurface plot (can take some time to render).
The default record name is the source file name.
 STRUCTURE
STRUCTURE records are designed to describe an atomistic structure, such as those commonly used in molecular dynamics or electronic structure simulations. These records can be visualised in the Atomic Structure Element. The following common formats are parseable by the platform:
XYZ
FHI-AIMS
VASP POSCAR
LAMMPS (data file)
CASTEP
PDB
Note
Only atomic positions and types are parsed and stored in the data record. Any additional information in the file will not be included in the database.
Note
XYZ file may contain multiple frames of a trajectory, but only the first frame is actually parsed and stored in the database.
Each file generates one preview object, displaying the table of atomic coordinates and a 3D rendering of the system.
The default record name is the source file name.
 SPM
SPM
This parser can extract data from raw scanning probe data files, and organises it into COMPOSITE records of SPM subtype. These records can then be visualised and processed in the Scanning Probe Microscopy. Currently supported raw data file formats are:
Nanonis SXM
IBW (Asylum Research)
Createc (.dat)
Omicron Matrix* (see SPM / Matrix)
Note
Only multi-channel 2D images are supported.
Each file generates one preview object, where the user can inspect the 2D plots of the channels and a partial list of extracted metadata (depending on the source file format)
The default record name is [SPM] filename.
SPM / Matrix
This parser extracts data from raw files generated by Omicron Matrix controllers, and organises it into COMPOSITE records of SPM subtype. These records can then be visualised in the Scanning Probe Microscopy.
Note
The parser requires the user to drag&drop or select folders instead of files. The system determines how to find and organise information based on the location of _0001.mtrx files in the overall selection.
Note
Only multi-channel 2D images are supported.
The parser generates one preview_object (and its related data record) for each cycle/session/dataset/sample found in the list of selected files. All matrix data files belonging to the same sample should be in the same folder as their _0001.mtrx master file. The parser will further split them into separate records according to their dataset, session ID and cycle number.
The output record name is [SPM] sample_name-data_set_name-session-cycle.
 NMR / Bruker
This parser extracts data from raw Bruker TopSpin files, and organises it into COMPOSITE records of NMR subtype. These records can then be visualised in the Nuclear Magnetic Resonance.
Note
The parser requires the user to drag&drop or select folders instead of files. The system determines how to find and organise information based on the location of proc files in the overall selection.
Note
Only the NMR spectra and some metadata are encoded in the data record. Most files describing the state of the instrument are ignored.
Note
Only 1D and 2D spectra are supported.
Each detected experiment generates one preview object, where the user can inspect the plots of NMR channels.
The default record name is [NMR] foldername.
Data Records
Data is seamlessly incorporated into notebooks through the editor. Typically, when data is uploaded, the client browser is responsible for parsing the file and compile a data record to upload to the server. The platform supports records of several basic types, listed here:
type |
description |
|---|---|
DATA0D |
Scalar value |
DATA1D |
One-dimensional array of elements (numbers or not) |
DATA2D |
Two-dimensional array (matrix) |
DATA3D |
Three-dimensional tensor |
FILE |
Generic file, not parsed by the system |
IMAGE |
Image data parsed from a jpg or png |
STRUCTURE |
Descriptor of an atomistic structure |
COMPOSITE |
Complex data structure made of other records |
Data parsing and upload is done by the notebook elements (e.g. images, tables, …). Each data type can be uploaded from the the configuration panel of a notebook element that is intended to visualise or operate with that particular type. For example IMAGE records are uploaded through image elements, while DATA1D records are parsed out of the columns of CSV files in the table elements.
Files intended to be uploaded without parsing will become FILE records, uploaded by the Data Explorer upload tab.
Each record consists of a data structure with various fields. On the server they are python dictionaries, transferred to the client as JSON strings, where they finally become JavaScript objects.
field |
type |
description |
|---|---|---|
name |
string |
name of the record (unique in the notebook) |
uuid |
string |
a unique ID (within the notebook, likely also everywhere) |
type |
TYPE |
The built-in data type (see Built-in data types) |
units |
string |
physical units of the data (see Physical Quantities) |
data |
object |
data content, variable format depending on type |
Warning
In principle there is no limit to the size of a data record, however, in practice the browser limits memory usage to a quite small portion of the total available memory. For this reason, the client cannot open and parse too large files. The maximum file size depends on the browser’s configuration (typically about 100 MB).
Note
Records of type FILE and IMAGE are not parsed, but sent directly as a binary stream, thus they do not have size limits (apart from reasonableness).
Metadata Systems
Metadata is an important tool to curate and sort data, making it easy to search, use and understand. AMAD offers three metadata systems: tags, value-tags and inventory-tags.
Metadata for a record, or a selection of multiple records, is accessed from the ref_dataexplorer explore tab, using the ![]() edit button in the metadata
edit button in the metadata ![]() details section.
details section.
 Tags
Tags
Tags are simple labels that can be attached to data records. For example, data coming from experiments can be tagged with an experimental tag. Custom user tags can be defined using the Tags Tab of the Data Explorer.
Note
Tag definitions are global in the AMAD database. All users will be able to attach any tag to their data, regardless who defined it.
 Value-Tags
Value-tags (v-tags) are tags that can hold a custom value, also known as key-value pairs. The tag name and description are set when the v-tag is defined. Its value is assigned by the user when the v-tag is attached to a data record. v-tags can be useful to tag data records depending on some external conditions such as acquisition temperature or pressure, or a particular methodology. Custom v-tags can be defined using the Value-Tags Tab of the Data Explorer.
Note
v-tag definitions are global in the AMAD database. All users will be able to attach any defined v-tag to their data.
 Inventory Tags
Inventory tags are labels, much like normal tags, but restricted to inventory items (see Inventory). These are automatically defined when an item (tool, instrument, …) is added to a Lab. Users can use inventory tags corresponding to all the items in all the labs where they are members.
Data Explorer
The data explorer (![]() ) is the main access panel for dealing with data and metadata.
) is the main access panel for dealing with data and metadata.
Explore Tab
By default, the Data Explorer opens with the explore tab, that looks like the usual file manager on any graphical operating system.
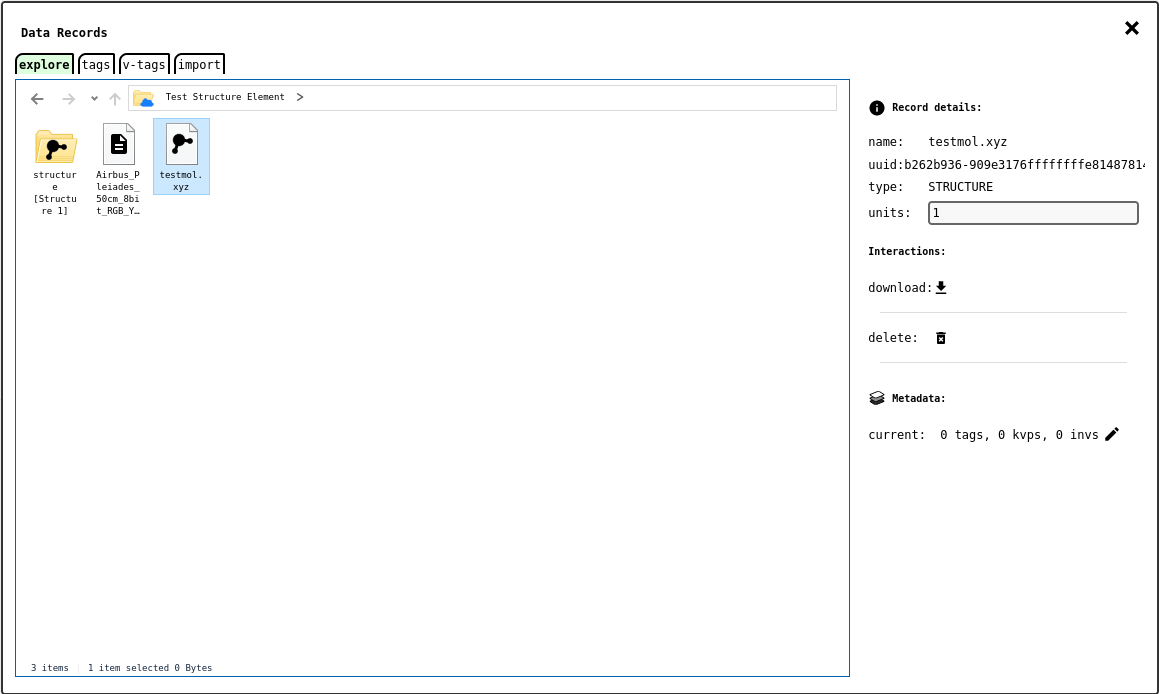
Data Explorer - explore tab .
Most data records uploaded into the notebook will appear as files in the notebook root folder; composite data records, such as SPM or NMR are shown as folders, and their children data records can be found inside. Additional folders are created for certain notebook elements that create their own data records. For example, the Atomic Structure Element, when configured in static mode will generate an IMAGE record with a snapshot of the rendering. Similarly, the DATA0D records associated with an Active Table Element are placed inside a dedicated folder named after the table (e.g. Table 1).
Records can be renamed as in a conventional file manager: select the item to rename and click it once more to start editing its name.
Note
It might not be possible to rename certain data records generated by the system.
When a single data record is selected, the panel on the right will show some more details about it, if available, and an editable text area with its physical units, useful when the original raw data files do not contain physical units information (which is often the case).
Note
Changing physical units will not perform a conversion on the data: this will only replace the current record units with the given ones.
Interaction buttons to edit metadata (![]() ,|icon-edit|), download (
,|icon-edit|), download (![]() ) or delete (
) or delete (![]() ) the record are also shown in the panel.
) the record are also shown in the panel.
Clicking the ![]() button in the
button in the ![]() metadata section will open the Metadata Editor. Metadata can be edited in bulk for a selection of multiple records at once if needed.
metadata section will open the Metadata Editor. Metadata can be edited in bulk for a selection of multiple records at once if needed.
The ![]() button will open a selection panel where the user can chose the format to use for retrieving the data.
button will open a selection panel where the user can chose the format to use for retrieving the data.
Warning
Some data types cannot currently be downloaded.
The ![]() delete button, or alternatively pressing the delete key on the keyboard, will permanently, inevitably and unrecoverably delete the selected records from the notebook so that its data and any trace of it will no longer exist anywhere on the platform. A confirmation dialog will be shown first, where the user is required to type the record name onece more before its complete and utter obliteration.
delete button, or alternatively pressing the delete key on the keyboard, will permanently, inevitably and unrecoverably delete the selected records from the notebook so that its data and any trace of it will no longer exist anywhere on the platform. A confirmation dialog will be shown first, where the user is required to type the record name onece more before its complete and utter obliteration.
Warning
Absolute, undeniable erasure of the data!
Explore Tab - Metadata Editor
This tab is part of the Explore tab, but it is shown when the user edits the metadata for a selection of records.

Data Explorer - metadata editor tab .
The tab lists the records for which metadata will be applied, and the metadata they have. Tags found only in some records, but not all, are rendered differently, with a warning, and a button to harmonise the tag across the whole record selection.
The lower side of the tab shows the metadata type and tag selectors, and the button to add the chosen tag to the selection.
Tags Tab
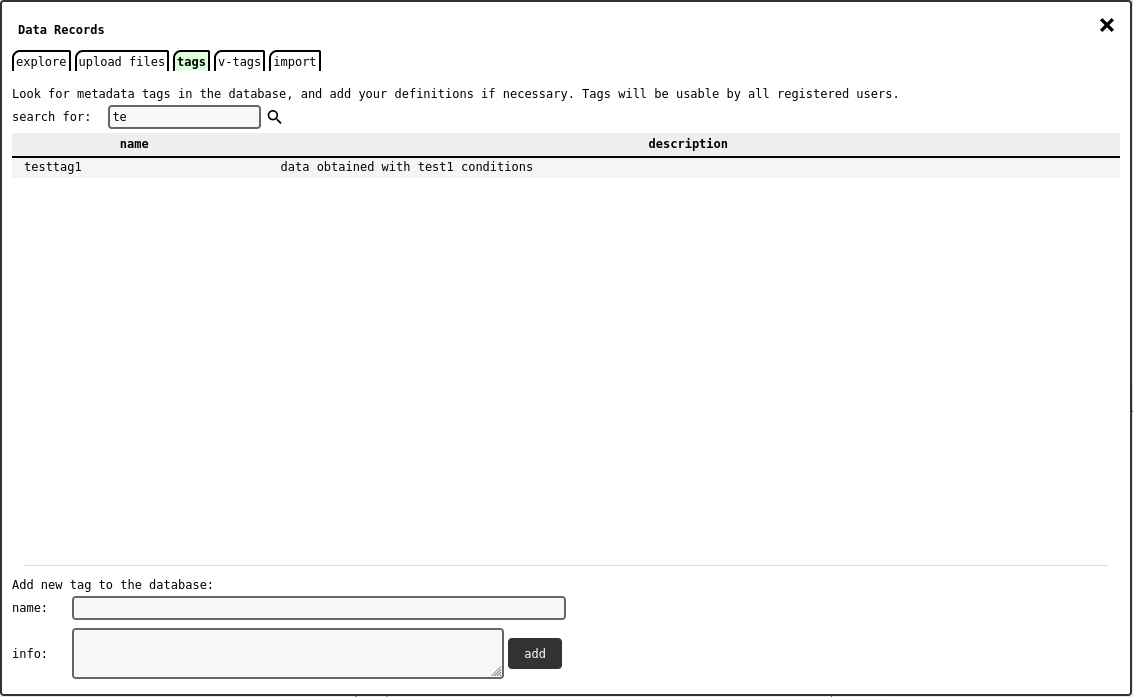
Data Explorer - tags tab .
With this tab, users can search for available metadata tags (see Metadata Systems) and add their own definition.
To add a new tag definition, fill the name and info text fields and click the add button. Tag names must be unique in the database.
Note
Definitions are global in AMAD database. Please look for suitable, existing tags before defining new ones, and report duplicates to system administrators.
Value-Tags Tab
This tab is analogous to the Tags Tab but operates with value-tags (see Metadata Systems).
To add a new tag definition, fill the name and info text fields and click the add button. Tag names must be unique in the database.
Note
Definitions are global in AMAD database. Please look for suitable, existing v-tags before defining new ones, and report duplicates to system administrators.
Import Tab
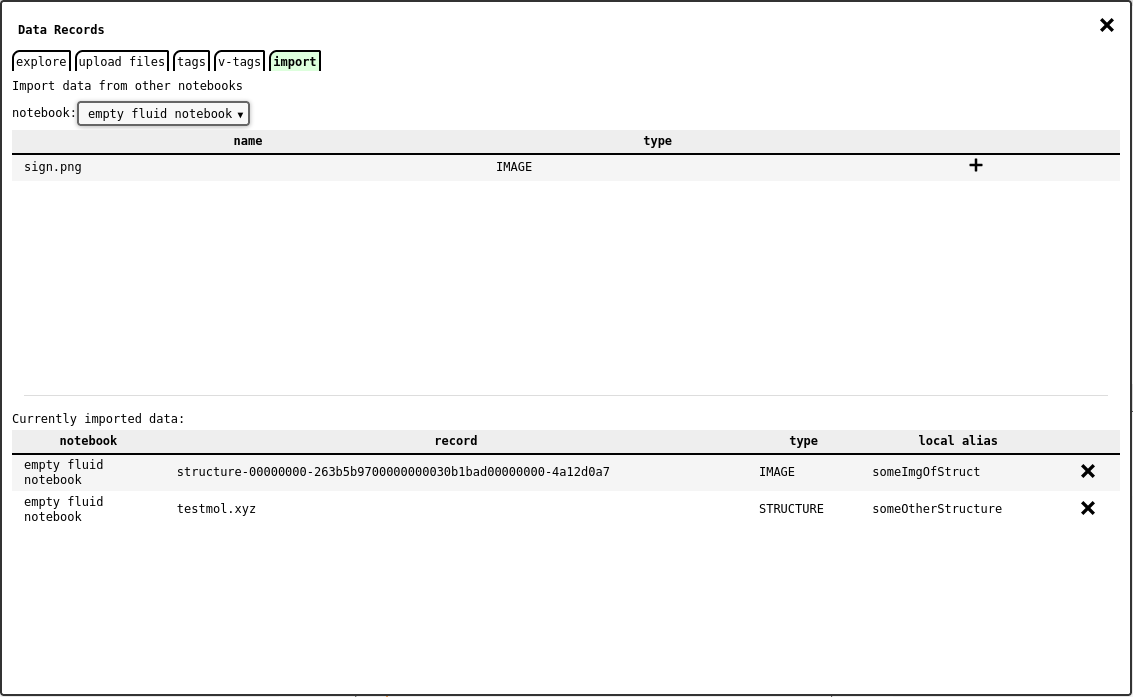
Data Explorer - import tab .
The import tab of the data explorer lets the user import data records from any other accessible notebook into the currently opened one. This will not clone the data, but only create a reference to the source record, with the same metadata.
In order to import data, chose the source notebook from the dropdown list: this will update the list of records available in that notebook. Then press the ![]() button of the desired record to import it.
button of the desired record to import it.
The system will prompt a dialog asking for the local alias to use as record name within the notebook, thus avoiding possible name conflicts with pre-existing records.
Note
Imported records initially have the same metadata copied from the source records. Any metadata changes will only not affect source records.
The tab also shows a list of imported records, where it is possible to remove them from the notebook.
Note
Deleting imported data will not delete the original record, but only the reference.
Warning
If the source record is deleted, the reference will lose its meaning, as the actual data no loger exists.